Getting Started with HA Proxy [High Availability]
February 17, 2013HAProxy is a very fast, very awesome and very free TCP/HTTP Load Balancer and Failover program. Its very simplistic but also quite powerful. The configuration is flexible enough to fit into many high traffic infrastructures but also simple enough to fit into any design seeking simple high availability. It can support tens of thousands of connections at high speeds and can even private a private to public address “translation” if you will by hiding web servers from the internet.
One of the most popular scenarios for HA Proxy is load balancing in its simplest form. A web server struggling to keep up with traffic demands would benefit by throwing the software in front of the web server, adding a second server and balancing between the two. This would effectively cut the load in half on any individual server and distribute it amongst the two, or however many you want, and should yield a much more stable web site.
However load balancing is only the beginning, because of the powerful nature of the config many webmasters have found that much of its value lies in its ability to be a “traffic cop” if you will. Imgur has a really interesting post on how they utilize the software, not for load balancing, but for directing any image requests to another server. Essentially, HA Proxy is grabbing any GET requests destined for any JPG, PNG or whatever and sending to a separate Lighttpd process and everything else goes to apache. It would be trivial to take this concept and use it to your advantage. Rather than writing any custom code to separate out certain elements you could simply write your requests in HA Proxy to rewrite your images, javascripts, css files, whatever to a CDN and send all traffic to a dedicated server. Its the flexibility and power that makes this a necessary piece of software for any linux fan to take hold of. There are dozens of other case uses (Conveniently located on their site) and quite a few more advanced features. For now, lets just get this software installed and setup a basic round robin config setup!
The Setup
The setup that we will be working with is populated with 1 HAProxy box and 2 web servers all on a single LAN. You can see the layout in this image:
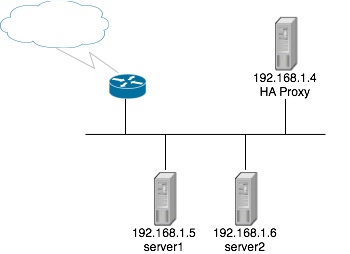
All configuration will be done on the HAProxy machine and it is assumed that the web servers are already configured and displaying correctly. The HAProxy box I am using is running CentOS 5. Lets get started!
Installing
If you are using CentOS, you will need to enable the EPEL repo and then simply install it via yum:
yum install haproxy
Debian should have this package in the default repo:
sudo apt-get install haproxy
If you are like me and love installing things from source, first make sure you have gcc installed. If you’re on CentOS, I just like installing all of the development tools. If you are low on space or resources you may not want to install everything but its just easier in my opinion:
yum groupinstall "Development Tools"
The download and compile the program:
cd /usr/local/src/
wget http://haproxy.1wt.eu/download/1.4/src/haproxy-1.4.22.tar.gz
tar xzf haproxy-1.4.22.tar.gz
cd haproxy-1.4.22
make TARGET=linux26 #Change TARGET accordingly
cp haproxy /usr/sbin/
On the fifth line, make sure that you change the TARGET to your linux version. If you are unsure, run the following and record the first 2 numbers:
uname -r
You can also append “ARCH=i386” to build the 32 bit binary if you are running on a 64 but system. HAProxy works on quite a few machines, you have the following options when it comes to the TARGET variable:
- linux22 for Linux 2.2
- linux24 for Linux 2.4 and above (default)
- linux24e for Linux 2.4 with support for a working epoll (> 0.21)
- linux26 for Linux 2.6 and above
- linux2628 for Linux 2.6.28 and above (enables splice and tproxy)
- solaris for Solaris 8 or 10 (others untested)
- freebsd for FreeBSD 5 to 8.0 (others untested)
- openbsd for OpenBSD 3.1 to 4.6 (others untested)
- aix52 for AIX 5.2
- cygwin for Cygwin
- generic for any other OS.
- custom to manually adjust every setting
You can launch the haproxy by running the following command:
haproxy -f /etc/haproxy/haproxy.cfg -sf `pgrep haproxy`
This can be ran multiple times without fear of spawning overlapping processes. The “-sf pgrep haproxy” will kill off the previous command if it exists and launch HAProxy using /etc/haproxy/haproxy.cfg as its config, which we will configure in the next section.
You can also create an init script from the file included:
cp examples/haproxy.init /etc/init.d/haproxy
chmod a+x /etc/init.d/haproxy
Note that this will not run until /etc/haproxy/haproxy.cfg is configured…so lets do that!
Build a Basic Config
We are going to assume that your config is held in /etc/haproxy/haproxy.cfg. Please note that if you installed this with a precompiled binary such as through a deb package or RPM this may be different. For us though, we need to first create the /etc/haproxy folder, once created touch a file called haproxy.cfg. Open the file with your favorite editor and paste the following:
defaults
        log     global
        mode    http
        option  httplog
        option  dontlognull
        retries 3
        option redispatch
        maxconn 20000
        contimeout      5000
        clitimeout      50000
        srvtimeout      50000

listen webservers 192.168.1.4:80
       mode http
       stats enable     #Optional: Enables stats interface
       stats uri /haproxy?stats     #Optional: Statistics URL
       stats realm Haproxy\ Statistics
       stats auth haproxy:stats     #Optional: username:password of site
       balance roundrobin     #balance type
       cookie webserver insert indirect nocache
       option httpclose
       option forwardfor     #Add X-ForwardFor in the header
       server server1 192.168.1.5:80 cookie server1 weight 1 check
       server server2 192.168.1.6:80 cookie server2 weight 1 check
Modify this if needed and save it to /etc/haproxy/haproxy.cfg. Once you’re finished we can actually check the syntax of this config file by running the following:
haproxy -f /etc/haproxy/haproxy.cfg -c
If its good, you should see “Configuration file is valid”. Go ahead and start everything up!
/etc/init.d/haproxy start
Go ahead and visit http://192.168.1.4 in your web browser and you should see the page from one of your two web servers! Pretty cool right?!
Config Commentary
I added a few comments to some of the lines within the config to help better explain what it does. Here is a little more info on some of those commands.
-
Stats Commands
- stats enable - Simply enables the statistics web interface
- stats uri /haproxy?stats - This defines the url where you can visit the stats. ex: http://192.168.1.4/haproxy?stats
- stats realm Haproxy\ Statistics - The site info in the authentication box
- stats auth haproxy:stats - The username and password of the url above. If this is removed the stats site will not require authentication
-
balance roundrobin - The method used to balance between the two servers. Here is a list of the more popular options below, the full list can be found in the documentation
- round robin - Each server is used in turns, according to their weights. This is the smoothest and fairest algorithm when the server’s processing time remains equally distributed.
- source - The source IP address is hashed and divided by the total weight of the running servers to designate which server will receive the request. This ensures that the same client IP address will always reach the same server as long as no server goes down or up. If the hash result changes due to the number of running servers changing, many clients will be directed to a different server.
- leastconn - The server with the lowest number of connections receives the connection. Round-robin is performed within groups of servers of the same load to ensure that all servers will be used. Use of this algorithm is recommended where very long sessions are expected, such as LDAP, SQL, TSE, etc… but is not very well suited for protocols using short sessions such as HTTP
-
server server1 192.168.1.5:80 cookie server1 weight 1 check - There are a lot of options you can use here. Lets break some down
- cookie [value] - Sets the name of the cooke to store on the client. In this case its named server1
- weight [int] - This, to put it simply, puts a specific value on the servers power/importance. In our scenario both are valued at 1 meaning that both are taken as equally powerful and thus should be equally distributed. The default is 1, the max is 256. The higher the number the more load on the server proportional to the values of the other servers.
- backup - If this value is added in the server line, it is disabled unless all non backup servers go down. This is good if you want to only use this as a failover.
- check - This enables health checks on the server. If this is not added a server will always be considered available even if it actually is not physically up.
- disabled - When added the server is marked as down in maintenance mode
- fall [int] - States how long to wait until the server is considered to be down. Default is 3
- rise [int] - States how long to wait until the server is backup. Default is 2
There are many more options and more explanations which can be found in the documentation.
What Next?
About that documentation, you can find it here. There are far too many options to detail here, this being a beginners guide. There are some more examples and commands that are pretty cool and should help you out!
- monitor-uri /haproxy - When this is enabled, visiting http://192.168.1.4/haproxy it simply provides a success 200 if the haproxy service is working
- option httpchk /check.html - Essentially its a much more powerful version of the “check” command. It checks the backend servers and checks /check.html. It its anything but a valid 200 response, it marks the server as down. You can take this a step further and create a php page that check for apache, mysql, server load, etc… and if any one of those is invalid it sends an error 500. This will take the server down until you can correct it.
ACL’s and Frontends
I wanted to wrap this up with another sample configuration. This one actually incorporates one of my favorite features and that’s front ends and ACL’s. Take a look ad this:
global
    daemon
    #maxconn 30000
    #ulimit-n 655360
    #chroot /home/haproxy
    #uid 500
    #gid 500
    #nbproc 1
    pidfile /var/run/haproxy.pid
    log 127.0.0.1     local4 notice

defaults
    mode http

    clitimeout          600000   # maximum inactivity time on the client side
    srvtimeout          600000   # maximum inactivity time on the server side
    timeout connect     8000     # maximum time to wait for a connection attempt to a server to succeed

    stats enable
    stats auth      admin:password
    stats uri       /admin?stats
    stats refresh   5s
    stats hide-version
    stats realm "Loadbalancer stats"
    #option httpchk GET /status
    retries     5
    option redispatch
    option forwardfor
    option httpclose

    monitor-uri /test

    balance roundrobin  # each server is used in turns, according to assigned weight

    default_backend default

frontend http
    bind :80

    acl nagios path_reg ^/nagios/?
    acl app path_reg ^/app/?
    acl mysite path_reg ^/blog/?

    use_backend nagios if nagios
    use_backend app if app
    use_backend mysite if mysite

backend default
    server web1 172.16.1.201:80 cookie A check inter 1000 rise 2 fall 5 maxqueue 50 weight 30
    server web2 172.16.1.202:80 cookie B check inter 1000 rise 2 fall 5 maxqueue 50 weight 75
    stats admin if TRUE
    option httpchk HEAD /check.txt HTTP/1.0
    errorfile 503 /var/www/html/503.html

backend nagios
    server nagios 172.16.1.217:80 check inter 1000 rise 2 fall 5 maxqueue 50 weight 30
    errorfile 503 /var/www/html/503.html

backend app
    server clear 172.16.0.39:81 check inter 1000 rise 2 fall 5 maxqueue 50 weight 30

backend mysite
    server mysite 172.16.1.203:80 check inter 1000 rise 2 fall 5 maxqueue 50 weight 30
The defaults section are a set of instructions that apply to all backend servers. Really useful if you have a few set of instructions that need to apply to everything. In the ACL section for “nagios” we see a regex value that matches /nagios. Then below it a command says that if the incoming request matches the regex value, then pass it to the “nagios” backend! So if someone hits http://192.168.1.4/nagios, HAProxy will display data from http://172.16.1.217/nagios! You can also match GET requests as stated in the beginning and match images, javascript files or whatever and use an ACL to route them wherever you want!
HAProxy’s config is really easy to use and it has a lot of value in a web stack. I hope this has given you at least the basics of HAProxy and that you have found some value in it. Enjoy!